Pre-lecture materials
Read ahead
Before class, you can prepare by reading the following materials:
Acknowledgements
Material for this lecture was borrowed and adopted from
Learning objectives
At the end of this lesson you will:
- Redirect a command’s output to a file with redirect operators (
>,>>). - Construct command pipelines with two or more stages with the pipe operator (
|). - Write a loop that applies one or more commands separately to each file in a set of files.
- Explain why spaces should not be used in file names inside of loops.
Pipes
Capturing output from commands
In this section, we will continue to explore how to use pipes to re-direct output from to the terminal and write it to a file.
The dataset we will use is a folder that contains six files describing some simple organic molecules. The .pdb extension indicates that these files are in Protein Data Bank format, a simple text format that specifies the type and position of each atom in the molecule.
ls proteinscubane.pdb
ethane.pdb
methane.pdb
octane.pdb
pentane.pdb
propane.pdbLet’s count the lines in one of the files cubane.pdb using the wc command (word count):
wc -l proteins/cubane.pdb 20 proteins/cubane.pdbUsing wildcard (*), list out all the number of lines in each .pdb file in the protein directory
## try it out This is useful information, but all of that output gets printed to the screen and then it’s gone. Let’s try saving the output to a file with the redirection > operator:
In the previous lecture, we learned that if we wanted to redirect that output from printing to the terminal and write to a file, we use the > operator like so (command > [file]) where on the left side is output gets piped into a file on the right side.
Write the commands for the followings tasks:
- Using the
>redirect operator, pipe the output from our example above to a file calledlengths.txt. - Print the file contents in
length.txtto the screen.
## try it out Appending data to a file
In general, it is a very bad idea to try redirecting the output of a command that operates on a file to the same file.
For example:
Bash
sort -n lengths.txt > lengths.txtDoing something like this may give you incorrect results and/or delete the contents of lengths.txt.
An alternative is another type of redirect operator (>>), which is used to append to a file (command >> [file]).
Let’s try this out.
Now test the commands below to reveal the difference between the two operators
echo hello > testfile01.txtecho hello >> testfile02.txtTask: Try executing each command twice in a row and then examining the output files. What happened?
OK let’s clean up our space before we move on
rm testfile01.txt testfile02.txtPassing output to another command
Another operator is the vertical bar (|) (or pipe operator) which is used between two commands to pass the output from one command as input to another command ([first] | [second]).
Let’s sort the rows in lengths.txt in a numeric order and then pipe the output into another command to show only the first row.
cat lengths.txt 20 proteins/cubane.pdb
12 proteins/ethane.pdb
9 proteins/methane.pdb
30 proteins/octane.pdb
21 proteins/pentane.pdb
15 proteins/propane.pdb
107 totalsort -n lengths.txt | head -n 1 9 proteins/methane.pdbLet’s practice using the pipe operator and combine three commands together. Write the following commands and pipe the output with the | operator.
Using the *.pdb files in the protein folder:
- Count the number of lines in each each
*.pdbfile. - Sort the lines numerically in an ascending order.
- Show the first line of the output.
## try it outLoops
Loops are a programming construct which allow us to repeat a command or set of commands for each item in a list.
- As such they are key to productivity improvements through automation.
- Similar to wildcards and tab completion, using loops also reduces the amount of typing required (and hence reduces the number of typing mistakes).
Suppose we have several hundred genome data files ending in .dat and our goal is to extract a piece of information from each file.
The dataset we will use is a folder that only has 3 example files (basilisk.dat, minotaur.dat, and unicorn.dat), but the principles can be applied to many many more files at once.
The structure of these files is the same. On the first three lines:
- the common name,
- classification, and
- updated date
The DNA sequences are given in the following lines within each file. Let’s look at the files:
cd creatures
head -n 5 basilisk.dat minotaur.dat unicorn.dat
==> basilisk.dat <==
COMMON NAME: basilisk
CLASSIFICATION: basiliscus vulgaris
UPDATED: 1745-05-02
CCCCAACGAG
GAAACAGATC
==> minotaur.dat <==
COMMON NAME: minotaur
CLASSIFICATION: bos hominus
UPDATED: 1765-02-17
CCCGAAGGAC
CGACATCTCT
==> unicorn.dat <==
COMMON NAME: unicorn
CLASSIFICATION: equus monoceros
UPDATED: 1738-11-24
AGCCGGGTCG
CTTTACCTTAHere, we would like to print out the classification for each species (given on the second line of each file).
One way to do this is for each file, we could use the command head -n 2 and pipe this to tail -n 1.
Loop basics
Another way to do this is to use a loop to solve this problem, but first let’s look at the general form of a for loop, using the pseudo-code below:
Bash
for thing in list_of_things
do
    operation_using $thing    # Indentation within the loop is not required, but aids legibility
done
and we can apply this to our example like this:
cd creatures
for filename in basilisk.dat minotaur.dat unicorn.dat
do
    head -n 2 $filename | tail -n 1
done
CLASSIFICATION: basiliscus vulgaris
CLASSIFICATION: bos hominus
CLASSIFICATION: equus monoceros- When using variables it is also possible to put the names into curly braces to clearly delimit the variable name:
$filenameis equivalent to${filename}, but is different from${file}name. You may find this notation in other people’s programs.
- We have called the variable in this loop
filenamein order to make its purpose clearer to human readers. The shell itself doesn’t care what the variable is called; if we wrote this loop withx:
cd creatures
for x in basilisk.dat minotaur.dat unicorn.dat
do
    head -n 2 $x | tail -n 1
done
CLASSIFICATION: basiliscus vulgaris
CLASSIFICATION: bos hominus
CLASSIFICATION: equus monoceros- Spaces are used to separate the elements of the list that we are going to loop over. If one of those elements contains a space character, we need to surround it with quotes, and do the same thing to our loop variable.
for x in "spooky ghost" "scary monster" "creepy spider"
do
   echo $x
done
spooky ghost
scary monster
creepy spider- There are other types of loops including
- The
forloop: executes the given commands over a series of defined number of iterations - The
whileloop: executes the given commands until the given condition changes from true to false - The
untilloop: executes the given commands until a given condition becomes true - The
selectloop: easy way to create a numbered menu from which users can select options. It is useful when you need to ask the user to choose one or more items from a list of choices.
Using the six files in the proteins folder, let’s predict what the output of these loops are.
cd proteins
for datafile in *.pdb
do
    ls *.pdb
done
cd proteins
for datafile in *.pdb
do
ls $datafile
donecd proteins
for datafile in c*
do
ls $datafile
donecd proteins
for datafile in *c*
do
ls $datafile
doneNaming files
You can also use the variables in for loops to name files or folders.
For example, let’s say we want to save a version of the original files in the creatures folder, naming the copies original-basilisk.dat and original-unicorn.dat, etc.
cd creatures
for filename in *.dat
do
    cp $filename original-$filename
done

ls *.dat
basilisk.dat
minotaur.dat
original-basilisk.dat
original-minotaur.dat
original-unicorn.dat
unicorn.datThis loop runs the cp command once for each filename. The first time, when $filename expands to basilisk.dat, the shell executes:
Bash
cp basilisk.dat original-basilisk.datand so on. Finally, let’s clean up our copies
rm creatures/original-*
ls creatures/*
creatures/basilisk.dat
creatures/minotaur.dat
creatures/unicorn.datBasics of bash scripting
We are finally ready to see what makes the shell such a powerful programming environment.
We are going to take the commands we repeat frequently and save them in files so that we can re-run all those operations again later by typing a single command.
For historical reasons, a bunch of commands saved in a file is usually called a shell script, but make no mistake: these are actually small programs.
Not only will writing shell scripts make your work faster — you won’t have to retype the same commands over and over again — it will also make it more accurate (fewer chances for typos) and more reproducible.
Create a .sh file
Let’s start by going back to proteins/ and creating a new file, middle.sh which will become our shell script:
cd proteins
touch middle.sh
We can open the file and simply insert the following line:
head -n 15 octane.pdb | tail -n 5This is a variation on the pipe we constructed earlier:
- it selects lines 11-15 of the file
octane.pdb.
We are not running it as a command just yet: we are putting the commands in a file.
We can see that the directory proteins/ now contains a file called middle.sh.
Once we have saved the file, we can ask the shell to execute the commands it contains.
cd proteins
bash middle.sh
File arguements
What if we want to select lines from an arbitrary file?
We could edit middle.sh each time to change the filename, but that would probably take longer than typing the command out again in the shell and executing it with a new file name.
Instead, let’s edit middle.sh and make it more versatile:
- Replace the text
octane.pdbwith the special variable called$1:
head -n 15 "$1" | tail -n 5Inside a shell script, $1 means ‘the first filename (or other argument) on the command line’.
We can now run our script like this:
cd proteins
bash middle.sh octane.pdb
or on a different file like this:
cd proteins
bash middle.sh pentane.pdbFor the same reason that we put the loop variable inside double-quotes, in case the filename happens to contain any spaces, we surround $1 with double-quotes.
Currently, we need to edit middle.sh each time we want to adjust the range of lines that is returned.
Let’s fix that by configuring our script to instead use three command-line arguments.
- After the first command-line argument (
$1), each additional argument that we provide will be accessible via the special variables$1,$2,$3, which refer to the first, second, third command-line arguments, respectively.
Knowing about $1, $2, $3, let’s modify middle.sh such that we can use additional arguments to define the range of lines to be passed to head and tail respectively.
## try it out- By changing the arguments to our command we can change our script’s behaviour:
This works, but it may take the next person who reads middle.sh a moment to figure out what it does. We can improve our script by adding some comments at the top of the file:
# Select lines from the middle of a file.
# Usage: bash middle.sh filename end_line num_lines
head -n "$2" "$1" | tail -n "$3"- A comment starts with a
#character and runs to the end of the line. - The computer ignores comments, but they are invaluable for helping people (including your future self) understand and use scripts.
- The only caveat is that each time you modify the script, you should check that the comment is still accurate: an explanation that sends the reader in the wrong direction is worse than none at all.
Finally, let’s clean up our space
cd proteins
rm middle.sh
Secure shell protocol
The Secure Shell Protocol (SSH) is a tool you can use to connect and authenticate to remote servers and services (e.g. GitHub, JHPCE, etc).
With SSH keys, you can connect to GitHub without supplying your username and personal access token at each visit. You can also use an SSH key to sign commits.
Overview
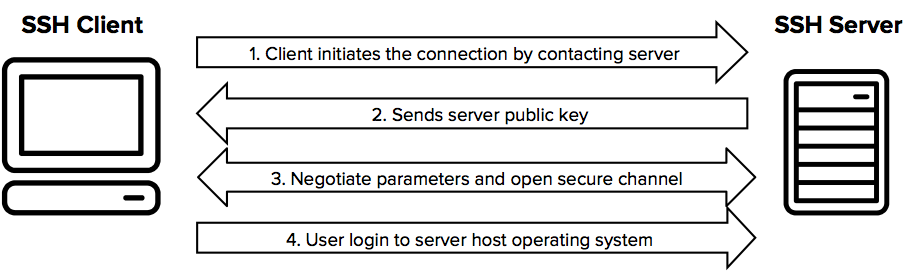
The SSH protocol uses encryption to secure the connection between a client and a server.
All user authentication, commands, output, and file transfers are encrypted to protect against attacks in the network.
For details of how the SSH protocol works, see the protocol page. To understand the SSH File Transfer Protocol, see the SFTP page.
You can read more about setting up your SSH keys to connect to JHPCE here:
https://jhpce.jhu.edu/knowledge-base/authentication/ssh-key-setup
Demo connecting to JHPCE via
ssh
You can read more about setting up your SSH keys to connect to GitHub here:
Post-lecture materials
If you haven’t already done it yet, follow the directions in the link above and set up your SSH keys for password-less connection to interact with GitHub.
Additional Resources
- Practice your command line knowledge with Command Challenge.