Get Started
Stephanie Hicks
cshlgsd2022.RmdCreate a copy of this repository
You can create a new GitHub repository in your own GitHub account
that is a copy of this repository for yourself to edit/write code and
notes. Github calls this “creating a template repository.” This is
different than a fork because there will be no link between the original
and your repository. From there, you can clone the repository with the
git clone command and run / edit the code in the
repository.
Creating a repository with the template can be done in the following way:
- Go to https://github.com/stephaniehicks/cshlgsd2022
- Click on the “Use this template” button at the top of the GitHub template repository
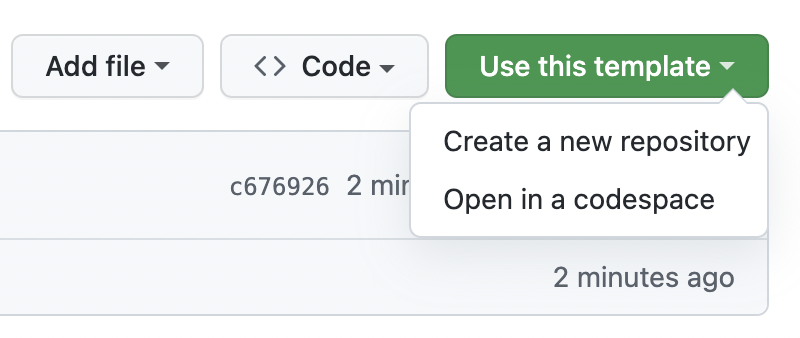
From there, you can follow these instructions. However do not optionally select “Include all branches” as you do not need this for your own projects.
Software
I will make heavy use of R, so you should have R installed. You can obtain R from the Comprehensive R Archive Network. There are versions available for Mac, Windows, and Unix/Linux. This software is required for this course.
It is important that you have the latest version of R installed. I
will be using R version 4.2.1. You can determine what
version of R you have by starting up R and typing into the console
R.version.string and hitting the
return/enter key. If you do not have the
latest version of R installed, go to CRAN and download and install the
latest version.
I will also make use of the RStudio interactive development environment (IDE). RStudio requires that R be installed, and so is an “add-on” to R. You can obtain the RStudio Desktop for free from the RStudio web site.
Install packages
These materials use Bioconductor version 3.15. This is the current ‘release’ version of Bioconductor, which can be installed following these instructions.
For example, you can then install a subset of the packages necessary for these tutorials using the following:
library(BiocManager)
install(c("SingleCellExperiment", "TENxPBMCData", "scater", "scran",
  "scry", "mbkmeans"))
Please see the DESCRIPTION
for a full list of dependencies.
Schedule
| Day (time) | Schedule | Topics (👩💻 Lecture, 🌴 Lab ) |
|---|---|---|
| Module 1 | Single-cell Data Science | |
| Jul 5 (1-4pm) | 1-1:25pm | 👋 👩💻 Introduction to single-cell [slides] |
| 1:25-1:30pm | 5min break; prepare for working in R/RStudio | |
| 1:30-2pm | 👩💻 Getting single-cell data and SingleCellExperiment
class [html] [Rmd] |
|
| 2-2:05pm | 5min break; pick 1 of 3 labs below to read through until 2:30pm | |
| 🌴 Lab (Getting single-cell data) [html] | ||
🌴 Lab (SingleCellExperiment class) [html] |
||
🌴 Lab (Importing counts from salmon alevin into
R/Bioc) [html] |
||
| 2:30-3pm | 👩💻 Best practices for single-cell data science [slides] | |
| 3-3:15pm | 👩💻 Overview of single-cell analysis in R/Bioconductor [html] [Rmd] | |
| 3:15-3:20m | 5min break; pick 1 of 3 labs below to read through until 3:50pm | |
| 🌴 Lab (Quality control) [html] | ||
| 🌴 Lab (Normalization) [html] | ||
| 🌴 Lab (Feature selection) [html] | ||
| 3:50-4pm | Wrap-up; next steps | |
| Jul 6 (10:30am-12pm) | 10:30-11am | 👩💻 More single-cell data science [slides] |
| 11-11:15am | 👩💻 Dealing with large single-cell data [html] [Rmd] | |
| 11:15-11:20am | 5min break; pick 1 of labs below to read through until 11:50pm | |
| 🌴 Lab (Dim reduction) [html] | ||
| 🌴 Lab (Clustering) [html] | ||
| 🌴 Lab (Marker gene detection) [html] | ||
| 🌴 Lab (Cell type annotation) [html] | ||
| 🌴 Lab (Python for R users) [html] [Rmd] | ||
| 11:50am-12pm | Wrap-up; next steps | |
| Module 2 | Spatial Transcriptomics Data Science | |
| Jul 6 (1-2:30pm) | 1-1:25pm | 👩💻 Introduction to spatially-resolved transcriptomics (SRT) [slides] |
| 1:25-1:30pm | 5min break | |
| 1:30-2pm | 👩💻 SpatialExperiment class and spatially variable genes
[slides]
[html] [Rmd] |
|
| 2-2:05pm | 5min break; pick 1 of labs below to read through until 2:25pm | |
| 🌴 Lab (Human DLPFC workflow) [html] | ||
| 🌴 Lab (Mouse coronal workflow) [html] | ||
| 2:25-2:30pm | Wrap-up; next steps | |
| Jul 7 (9-10:30am) | 9-9:50am | 👩💻 Python for R Users [html] [Rmd] |
| 9:50-10am | 10min break | |
| 10-10:30am | Open question time; Wrap-up |